I know this post is cutting into the journey–but, a video was posted on the vlog a few months back showing what exactly I carried in my pack. I mentioned adding a list onto the blog including links to the gear I used. Thankfully, a reader just reminded me that I have not yet posted it. So, without further delay–here is my gear list. Some of the links below are through my Amazon affiliate account. If you click on the image, it will pull up the details and price.
PACK
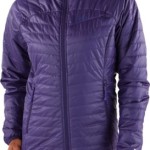
I had the same pack the whole trail–an Osprey Aura AG 50. It served me well. It was the perfect size for me and considering the minimal wear, it was very durable. This was my pack (except in grey):

This is the men’s equivalent:

SHELTER & BEDDING
Hammock/Tent
I started my journey with an ENO Double Nest Hammock and slap straps. I made my own rain fly and bug net.

I slept very well in the hammock. However, I was not an experienced hammock camper and decided to swap to a tent. I chose the Fly Creek UL2. There is only a 4 ounce difference between the one and two person version. I like being able to spread my stuff out in my tent, so the extra ounces were worth it for me.


Rather than purchasing a footprint, I opted to use a piece of Tyvek under my tent. It wasn’t the perfect size, but it was functional and much cheaper. However, if you prefer the actual footprint, there is one available.
Tyvek: Footprint:


Sleeping Bag
There are pros and cons when considering down vs. synthetic bags. I will provide more details in my e-book, but after weighing my options and what would work best for me, I chose the Sierra Designs Zissou 23-Degree 700 Fill DriDown Sleeping Bag. It was a men’s bag, but I did not care about color and it was cheaper than the pink/purple options in the women’s section.

Sleeping Bag Liner
Instead of swapping to a higher degree rating bag for the summer, I decided to swap to a fleece liner. I sent my sleeping bag home and only used this fleece liner.

Sleeping Pad
I began my journey with a baby blue foam closed cell mat. I read about foam vs. inflatable pads and after seeing the price difference, I decided to tough it out and save money. In New Jersey, I decided I couldn’t stand to sleep on the foam pad one more night, so I hitched to town and splurged on a new, inflatable, heavenly sleeping pad that is the ThermaRest Neo Air. If you sleep on your side or stomach go ahead and purchase an inflatable pad. You’ll thank me later!
My foam pad: Inflatable (heavenly) pad:


FOOTWEAR
Boots/Trail Runners/Camp Shoes
When I first started my hike, I thought I would want boots for more ankle support. I began with a nice pair of leather LOWA boots. They were comfortable and I never felt like I had to break them in.

After swapping to trail runners (which I prefer), I had 3 different pair of Salomons. I LOVE this brand and would say it was the most popular brand on the AT. My first pair was a woman’s style trail runner and they were gore-tex.

My next pair of Salomon’s I bought at Trail Days in Damascus. I ended up with a men’s style. I ended up with another pair of this same trail runner in New Hampshire and finished out with them. This was probably my favorite of all.

The third pair I wore was also a men’s trail runner. I actually like men’s color selection better.

I wore two different types of camp shoes. At first, I wore Teva strap on shoes. They were heavier than my second pair, but I could wear socks with them. Many people also wear Crocs. It’s all about your preference.
To wear with socks – No socks (or toe socks) –


Socks
There are a ton of options when it comes to socks! After trying Patagonia, SmartWool and Darn Tough, I would say my favorite brand is Darn Tough. It makes me sad to diss SmartWool like that, because I’ve always loved them. I even slept in a thick pair of them at night. But, you just can’t be the lifetime guarantee that Darn Tough offers. If you are going to have wool socks, might as well buy a quality pair. If you’re going to pay for a quality pair, might as well make sure they will last for life. I did not care for the Patagonia brand at all, so I did not include the link for those. Most of the socks I wore at some point on the trail are below:
Smart Wools


Darn Tough

For people who have blister issues, I heard that toe socks help A LOT. This is the brand (injinji) I saw on trail most often:


Insoles
Insoles are one of those pieces of gear that is difficult to really recommend. Everyone’s feet are different. I know people who never wore special inserts, but some will swear you have to. I wore three different brands during my hike. The first was the SOLE brand. I liked them because you heat them in the oven and then step onto them in your boot/shoe to form them to your foot.
SOLE –

After my feet swelled A LOT, I decided to try to mix things up. I had heard people rave over Superfeet, so I gave those a shot. Honestly, I can’t personally tell you that I felt a difference in the two. But, again, everyone’s feet are unique!
SuperFeet –

In Pennsylvania, I ended up with a terrible case of plantar fasciitis. I tried to remedy the problem in multiple ways, but one of the things I feel truly helped was the Dr. Scholl’s inserts for plantar fasciitis. I have continued to wear them, even after the trail.
Dr. Scholl’s –

CLOTHES & RAIN GEAR
Jacket
I carried a puffy coat, even in the summer. I chose an REI jacket with synthetic fill and a hood. This may not be the exact one, but it’s close. I LOVED having a hood on my coat.
Long Sleeved Shirt
When it was very cold, but not raining. I would wear my Under Armour long sleeved top. If it was raining, I kept it (and my jacket) put away so I would have something warm and dry to sleep in. I really liked the thumb holes in the sleeves of this shirt–especially because I did not have gloves.

Tank Top
I wore this North Face tank top and rotated out with another one (from Wal-Mart) for a while. At the end of my trip, I sent the Wal-Mart one home to lighten my load. You only really need one, I promise!

Leggings
I literally wore some leggings that were fuzzy on the inside (from the Body Shop). Nothing fancy about them except they were fuzzy and warm on the inside. Something like the ones below.

Shorts
I wore Patagonia shorts. They were on sale and seemed like they would be durable and dry quickly. They worked wonderfully for me the entire trail. I kept them even when it was cold for fording rivers or to wear under my rain pants.

Undergarments
I rotated between two sports bras throughout the trail. They were the same brand (bcg), but different colors. In Pennsylvania, I sent home one of them to save weight. It was similar to this:

I used two pair of underwear the whole trail. I had heard wonderful things about ExOfficio underwear from both women and men–and the rumors were true. They are amazing! The selling point for me is they are made to reduce odors…which is nice when you rarely bathe.
Women’s – Men’s –


Rain Coat & Pants
After buying the rest of my gear, I realized I probably wouldn’t be able to spend a ton on rain gear. To be honest, you’re going to probably end up wet anyway, if it rains long enough. For my rain suit, I opted to go with the ‘not so cute’ Frogg Togg outfit. If I end up with an extra couple hundred dollars at some point, I might invest in some fancy, light rain gear with ‘pit zips. But, for a tight budget, Frogg Toggs are the way to go.

COOKWARE & WATER FILTRATION
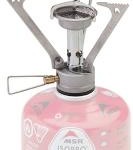
Stove
I used the MSR Pocket Rocket for the duration of my hike. I really like it a lot. It’s compact, durable and light weight.
Pot
I wanted a lightweight pot, but didn’t want to pay for titanium. So, I opted to go with aluminum. It is recommended to avoid cooking and eating with aluminum. But, I figured since I wasn’t using deodorant on the AT, I was offsetting my aluminum consumption. This is the simple grease pot I used.
I wanted to be able to cook on the fire with it, so I modified the knob, slightly. I would definitely use this same pot to cook on the PCT.

Spork
This nifty little spork is made from titanium and has a bottle opener on the end. The best part for me was the lifetime warranty.

Cup
By no means is this a necessity. But, I like to drink my coffee while eating breakfast, so a few more ounces of weight was worth the convenience to me. The Sea-to-summit Collapsible Cup takes up very little space. I was worried about it tearing up, but this bad boy trucked through 14 states with me.

Water Filtration
I began with the Sawyer Squeeze (the larger size, not the mini). It’s fairly inexpensive, light enough and does the trick! After a couple months, due to me over tightening, the filter gasket started tearing up. Then, the dirty water bag busted. The bags are replaceable and I’m sure the gasket is, as well. I would definitely use this system again.

In Virginia, I decided to try a new filtration system and selected the Platypus Gravity Filter. I love it. You simply fill the dirty water bag, hang it up, and wait for gravity to do the work for you. Easy, peasy.

I drank my clean water from a platypus water bladder which I drank through a hydration hose that clipped over my shoulder on my pack strap.
Hose and bite valve + 2 Liter bladder


ELECTRONICS
Back-Up Battery Charger

This is the upgraded version of the SoundLogic XT charger that I used. It was lightweight and offered me at least two charges for my iphone 6.
Head Lamp
The main thing to look for in a headlamp is BRIGHTNESS! You may think you only need it for wandering to the privy at night, but then next thing you know someone talks to into night hiking and you have the dimmest headlamp. I ditched my cheap $5-10 headlamp from Target within the first month. I upgraded (a little) to the Coast brand below. It lasted me my whole journey even through rainy nights. It could have been brighter, but again, it got me through. Other than brightness, you want a headlamp that has a red beam option, that way you aren’t blinding your fellow hikers.

For my 2017 PCT journey, I have upgraded a little more to a Black Diamond storm (below). I’ll let you know how it works out for me, but so far I’m pleased.

OTHER GEAR
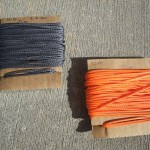
Bear Cord
I wanted a lightweight, slick cord and what I chose was Z-Line. I never had any issues with this cord and plan to use it again in the future.
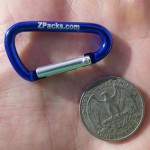
Carabiners
I did not need heavy duty carabiners because I only used them to clip onto my bear bag, and to hang my shoes from my pack while I was in town. I went with very light carabiners from Zpacks. Make sure you pay attention to the amount of weight you will be applying to the carabiners, as these are not meant to support the weight of a human.
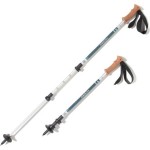
Trekking Poles
I wanted a mid-priced trekking pole as I was on a budget. It’s all about personal preference, but I prefer a cork handles. They seem to absorb sweat better than foam. I am VERY pleased with the way my poles performed. I never had any issues with them slipping even though they are collapsible (which I would highly recommend for convenience while in town). They aren’t as light as other options, but I would definitely use them again…if I hadn’t lost them on Katahdin. Ha.
Knife
You will see all sorts of knives on the trail. I saw a lot of folks starting with Rambo knives, but I assure you a small, lightweight pocket knife is all you NEED. My knife was less than 3 ounces and fit well in my hip belt pocket. It’s all about functionality.

Pepper Spray
I never once used my pepper spray, nor did I hear of anyone else using theirs. However, it is a nice security blanket when hitch-hiking. To me it was worth a little extra weight for peace of mind. I’m sure my Mom would agree.

Okay, in the next couple days I will complete this list. Also, I would like to finish updating you on my AT journey, so I can write about all of the exciting new things presently happening in my life. Stay tuned–
If you did not see my gear video, you can watch it here:
Happy Trails 🙂
Excellent information. Coming from you this is trusted information. You actually used these items, and not just for a 1~2-day hike.
Thank you! Hope it helps.
Hey there, really appreciate your vids. Plan to hike the A.T. this spring. Question: what’d you use the bear cable for and how?
The bear cord is to hang a bear bag. You just tie a rock to one end and toss it over a branch. Attach the food bag where the rock was and pull it up. Tie other end off to a tree. You can find tutorial videos on this on YouTube. Just search “hanging a bear bag.” Also, more experienced hikers will be happy to give you a hand while you’re out there!
Thanks… I’ve hung my food in in a bear bag for years awhile leap froggin.Just wasn’t familiar with the term “bear cable”.
Just confusion on the term so thanks for clarifying.
Regards
Hello Jessica, my name is Travis and I am from Ontario Canada . I like going on canoe trips and hiking as well , also lived on west coast for while. Just wanted to say I just found your YouTube channel! Very insightful, and inspiring!! Keep doing what you do!! “Eh” lol Thanks, from Canada
Hey Dixie how do I register to go on the at hike
Check this out!
http://www.appalachiantrail.org/home/explore-the-trail/thru-hiking/voluntary-thru-hiker-registration
Very cool Miss Jessica. I am going to take a look at the Dr. Scholls inserts. A long time ago in another life, I attempted the AT. I had a heck of a time with my feet. Plantar fascitis made walking on roads terrible. I am glad that you were able to get your malady under control. Thanks for keeping your dream alive with this blog and your future attempt on the PCT. I am right behind you girl! AT 2017 then PCT probably 2019. I’ll be 61 then. Happy trails 🙂
Julius ‘Kickatree’ Daniels
We’re you able to make the AT trek as planned and what was your experience? I’m of similar age and looking at doing the AT deed as its been a lifetime desire… From a guy who hated the 35 mile road matches in the ROK DMZ area when I but a 19 y/o pup back in 79-80.
What did you us to video the AT ….And can I hire the person that put your You Tube account together. Doing the AT spring of 2017
Potential sponsors for your PCT hike –
Tyvek – they will make a footprint for you as well possibly a pack cover and rain jacket. This could be an interesting opportunity to wear various fitness trackers to compare performance metrics as well as the collected data experienced while hiking long distance. Think of the bragging rights here.
+1 on Frog Toggs. Have you considered modifying the pants into a skirt/kilt? I cut mine down into a kilt but don’t yet have a lot of rain time in them. Saves a bit of weight and leaves you wet only below the knees, which you will be anyway.
Really appreciate your real world, real use perspective on gear.
Great idea. Will definitely use for myself & my son. Love to save weight where I can & he grows out of his pants at least once a year. Thanks!
Thanks for posting! I’m planning a NOBO thru-hike for 2017 and this gear list was very helpful. Were you happy with the size of your cooking pot? I’m currently looking at a 900mL titanium pot, which seems like a good size but I would love to hear your thoughts. I want to be sure I have room for all the food I need to cook once the hiker hunger kicks in, but I also don’t want the extra weight/space of something too big.
Kristen! You are welcome and I’m glad you found it helpful. I would recommend 1 L, so it sounds like you’re on the right track. My aluminum grease pot was 40 ounces or so, so right around 1L. I never felt like I needed anything bigger. Minimizing weight and space is a great idea. So excited for your hike!
what’s a grease pot, versus a traditional cook/mess kit pot?
Just heard u on TSP extremely inspiring! thanks for all the info
You go girl, awesome info & love your logic on why you chose what, thanks!!!!
Thanks for posting this list. The site design is good too. All the Best to you. -A
Another downside to titanium besides cost is that most, but not all, Ti pots are so thin they will warp over an open flame.
I have licked my plantar fasciitis with exercises–putting in insoles changed the fit of my shoes so much that I could not wear them. I had been told that wearing insoles is like permanently wearing a cast for a broken bone–the problem is muscular and continuing “to wear a cast” does not fix the underlying problem. Arching your feet, walking on the sides of your feet, heels and toes, stretching, rolling, etc., all help to rebuild the muscles. Since you have had the problem before, some pre-hike exercises ought to be a big help the next time on the long trail. No guarantees, as you might simply be pre-disposed, but it is harmless and might help. Also, I have been told that wearing the low lift shoes can help stretch the achilles tendon over time, so if you can find a pair of them that fits and is not overpriced you might try them around home while you are preparing for next time on the trail.
Keep on dreaming!
Hi, Jessica. I have a question for you: Have you ever tried one of these ‘ultralight’ cots linked below, OR did you meet anyone on the AT who was using one {or something similar}? Thanks in advance!
http://www.cabelas.com/product/CASCADE-DESIGNS-LUXURYLITE-ULITE-COT/1774129.uts?
{FWIW, I follow you on YouTube as “RocKiteman”.}
Loving your info as I recently stumbled upon your videos and site. I am planning a AT NOBO hike spring 2018.
For water, I use the Sawyer Mini and a little blue threaded nut I got on Amazon to attach a dirty bag and a clean bag. I used a hole punch to pop holes in the bottom of a 2L Platypus bag (they fit the Saywer threads) and looped a bit of paracord to make a rig that I can hang and filter while I do something else.
After going through several types of stoves, I think I’ve settled on a cat food can stove. I’m sure you saw them on the trail. Takes a bit longer, but is SILENT and actually pretty fuel efficient and everything I need fits into my pot.
I can absolutely recommend the neoair. Love mine.
I have a REI quarterdome 1 that weighs in around 2.5lbs with footprint, stakes, cords, etc. Thinking about switching to a tarp tent. Did you see folks using them? What feedback do you have? Also haven’t finalized bag or quilt. Leaning toward quilt and would enjoy your input as well. You may have info for this on videos I haven’t gotten to yet. Good luck with PCT!
Hi Dixie: Ran across your video series. Excellent! And congrats for getting out there and doing it!
I have now watched all your YouTube post and each is great and love the way you cover different things in each. So helpful. But now that you are planning, and nearly ready to leave, for the PCT, I seem to recall a video you did comparing what you packed for the AT v. what you planned to pack for the PCT. But now I can’t find it. and I seem to recall you posted somewhere a sort of “wish list” of things you had in mind for the PCT that you were looking for support on. can’t find that either now. Is it time to start a new section of HMWanderlust just about the PCT prep? It would be cool and easier to find stuff. I’m pulling for you. I know you can do it.
Recently, in May and June last year (2016), my daughter (she’s now 25), some friends, and I hiked a route of the Portuguese Camino de Santiago, and I was looking at gear we used (my daughter used a 53L Gregory Jade pack that she loved, lots of features, good fit, plenty comfortable, but pretty heavy, with a good aluminum “X” stay suspension, at around 3.9 lbs., carrying around 22 lbs or a bit more on some days – tho we had no tent, or cooking gear b/c we were hopping from pilgrim hostel to pilgrim hostel) and it made me wonder what had come out since then, similar, with structure and not just UL frame pad packs like the great ones from GG or ULA. I ran across a new series from Marmot with a true internal frame and trampoline back panel, like your Osprey. Here it is.
http://marmot.com/equipment-packs-and-haulers-multi-day-packs/graviton-48/24150.html?cgid=equipment_packs-and-haulers_multi-day-packs&dwvar_24150_color=2955&dwvar_24150_size=0085ONE
Keep up posted with your plans and God bless!
I can’t edit that last post, so am adding that the point of the above post is that instead of being a 3 to 4 lb. pack, like the Gregory Jade 53, or the Osprey Aura 50, this new Marmot Graviton 48L pack weighs in at 2lb 9 oz.! Including the brain. REI lists the weight of the Aura 50, Small size at 3 lb. 12 oz., so a weight savings of 1lb. 3 oz. and over the Gregory Jade 53 of a full pound! And REI currently lists the Aura 50 for $230. The Marmot Graviton lists the amazing price of around $180.
Don’t get me wrong, my daughter loved her Jade 53, and I liked the Zulu 55 at 3 lb. 11oz. and would get them again and we continue to use them. But I don’t think I would have hesitated, had this Marmot Graviton been on the market last spring before we left on the trip, to get it instead of the Gregorys. And if I was getting ready to gear up for it now, instead of last year, I’d be all over the Graviton like white on rice.
And by the way, the year before that we were in the Whites, hut to hut hiking with around early june, when ice on the trails was still an issue and the most determined were still hiking up to and skiing Tuckerman’s. For that trip she had an old GoLite Jam 50, which she liked and I was using a Gossamer Gear Gorilla, which I like a ton too. But for longer trail stuff, like the Camino, we wanted more structure to transfer load to the hipbelt that Gregorys are really good at. I thing this new Marmot bag would be just as good at that. And at a full pound less weight and a great price would be a no brainer if I was picking between the two today.
Just thought you might want to take a look at it.
I know you have a ton of stuff on your mind about now, looking probably toward a mid-April departure.
Keep up the focus. You’re in for a great time. All the best.
Thank you for your input on gear and the well wishes! Glad to hear you and your daughter get out in nature together 🙂 Happy Trails!
Hi Dixie, great videos! I’m planning a thru hike of the AT for this year, starting March 24. What dry bag did you use for your food? In the video you mentioned it is a 15 liter. Good luck on the PCT!!!
CONGRATS on your upcoming journey! I used a 15L dry sack from Academy. Nothing special. This one here should do you just fine and I’ve heard good things about this brand:
http://amzn.to/2mipo3z
Good luck to you and HAPPY TRAILS 🙂
dixie, I have watched every video of yo that I can find. and, I have come to the conclusionthat I am sure many others have! I LOVE YOU . if I were 30 years younger I would seek you out and “WOO” you until youloved me back.lol.
please don’tthink of me as a dirty old man, that is not me, I am at least 30 years too old for you, and am from a different time. Igrew up in the inner city of Cleveland and did not even know there was an appellation trail, sad to say I wasted so much of my life beieng stupid, had I known about the AT ,well at least I coulhave wasted my life hiking the trail. I am 65 years old and am going to try to get myself in good enough shape (free of medications) to attempt the throughhike in march 2017. I am going to give it my all in hopes that maybe our paths will cross.
so if you wish to sponcer an old man all or give me tips adavantages anythingwill be appreciated. good luck in everything you do! I see you have a naturalhead on your shoulders for business, you will be very successful, your going to make some young man the luckiestguy in the world and wdhen you decide your ready for motherhood, hey I can go on forever happy trails love bobby
Been following you for months on youtube. I never hiked a thru hike or a long hike. Since 2013 when my mom passed away due to old age i just wanted to do the appalachian trail. then 2014 came had two knee surgeries and now in 2017 no more knee pain. Now with a job getting my gear one by one. Still have to get more. The problem is if i do 2018 at which i will make it happen is the money. How do you get sponsors? So is 2,000 is not enough for cost on the trail or you need more? Im from new york which state do i start at and am im going south bound right?
I like your hiking videos. Thanks for the uplifting informative videos from the trail. I am in the process of getting my trail funds to go out on the trails and your videos helped me get a clue as to at least a starting point for funds needed for the trail. I have all the trail gear needed tent,sleeping bag, bear keg, so on and so on. Thanks
Great post, verrryy helpfull. One question, where did you get your spork!!!
Click on the photo of the spork, or any other item in Dixie’s list. It should take you to an Amazon page with all the details.
Just to make it easy, here is the Amazon page the pic of the spork links to:
https://www.amazon.com/gp/product/B00VC8HKDO/ref=as_li_tl?ie=UTF8&camp=1789&creative=9325&creativeASIN=B00VC8HKDO&linkCode=as2&tag=homemawander-20&linkId=Y3Y5AJUWFYCTHTXW
Oh great thanks a lot!! I didn’t notice the whole clicking-image logic haha.
Hey Dixie,
I’ve enjoyed your youtube videos! Wondering if you are available for a speaking engagement in early October 2017? Let me know if you’re interested. Pays a small stipend (probably would cover your travel). thanks!
Awww, thank you! If I’m done with the PCT by then I might be able to do it. Could you email me some details? homemadewanderlust@gmail.com
Hello Dixie:
Are you ready for another care package? We received your card, and we’re happy to help.
Vlog 13 just came out how far ahead are on the trail?
I would like to see relational Vlogs you and those you are traveling with or those that you have hike with for a while. Just an idea
Happy Trails
The Wolf Pack????
Have you thought of presenting classes at REI about the AT or the PCT?
Just a few ideas…
Let us know where you would like your next package.
Kim, Sam and Leo
My friend and I just decided to tackle this trail and are using your information and gear lists to help guide us on our journey!
Awesome! When do y’all start? You’re gonna love it 🙂
Just wondering what do you do about carrying ID, money,credit cards, etc. without these items getting lost or damaged
Some carry them in a designated ziplock. I have a granite gear wallet. I just keep it in my electronics bag.
Hi Dixie
I have been going out and walking 14 miles to get my feet sore and then lay back resting my feet watching you PCT progress, makes it more real you know. Enjoying your journey, great job to you and your editor for that product. I was looking for the camera type you chose for your jouney.
Safe journeys
I was wondering what you’re thoughts were on bringing Chacos as a camp shoe?
I currently do day hikes in my Chacos and lounge in them and figured they would be a good universal sandal to bring as well as my trail runners. My only concern is if they’d be worth the weight since them do tend to weight more than crocs.
I think they are a bit too heavy for my tastes, but I understand why you like them! I’d go with something cheap and light..knock off crocs or the lighter foam teva sandals. It may be worth it to you to carry the weight, though! You can always mail them back if you feel that way.
Hi!
I am planning to hike the trail starting this March. I am wondering if you brought stuff sacks for your different things, I have seen people bring them for food, clothing, and other things. I am considering using them and wanted to see if it was worth it.
Dixie, I would love to talk to you, via email if that would be ok with you. My husband is planning to hike the at , he was a pow in Iran and has severe PTSD. He will be accompanied by his service dog. I’m his support system and I know NOTHING. I REALLY NEED HELP and someone I can ask questions. I’ll tell you more if you email. Thanks. Kimberlyreneejustice@gmail.com
Kimberly! I’d be happy to help as much as I can. Send me an email to: HomemadeWanderlust@gmail.com
I’m planning for a NOBO thru hike of the AT this year! I’ve always been into hiking and camping and since I was little I’ve always wanted to hike across the country or around different country’s even. I just didn’t really know how to go about it or that these kinds of trails existed. I found out a few years ago and then a little over a year ago I found your videos of your hike of the AT. Inspiring to say the least. So back I’m April of last year I started saving to go on a thru hike myself and am going this year! Your lists and reviews on all of the gear are extremely helpful and I appreciate you and your time doing it so very much!!
Melissa! That is so wonderful to hear ???? Congrats on working hard to make your dream of thru-hiking come true. Hope you have an amazing journey and HAPPY TRAILS!
I am looking for an economical wrist watch. I remember you mentioned in one of your episodes you wore a casio. What style and did you like it?
Hey Shelly! This is the one I used on the AT and PCT: http://amzn.to/2DkUEuP
It’s simple but has the time, date, was durable enough for a thru-hike, water resistant enough to swim and shower with. Also has 2 alarm settings a light so you can see the time if you wake up in the middle of the night. I usually try to turn my phone off before bed to conserve battery. Hope that helps!
My wife and I are planning an AT section hike this spring and really appreciate all the information you are able to provide for our very first attempt. You have been such an inspiration for us!
Thank you, Luke! Good luck to y’all and have fun 🙂
I’m glad to hear y’all are getting out there and that the content I’m putting out has been helpful!
How do you register for the At northbound hike
Try this:
http://www.appalachiantrail.org/home/explore-the-trail/thru-hiking/voluntary-thru-hiker-registration
I am planning a section AT hike mid April 2018 starting in Georgia. Are the towns mainly cash only or do they accept credit cards equally? I am nervous about taking a large supply of cash. Thanks
The ones that require cash usually have an ATM in town. I never carried more than $50 at a time!
Really cool and incredibly helpful!
Thank you!
Hi! I am brand new to hiking. I used to hate camping and everything outdoors, yet alive always had an appreciation for nature and the beauty of the wildnerness. I’ve taken my dog on some local trails and I’m in love with hiking now and I do it every weekend. Could you email me with some tips and hints I i oil do buy as a beginner hiker? My goal is to hike the AT once I graduate which will be in about 3-4 years from now, but I want to start saving up money and preparing for it now. Any advice or pointers you could give me would be great. My email is gabemay1993@gmail.com
Hey Gabriel! So cool to hear you’re enjoying getting out there. I LOVE Colorado. Honestly, if you just browse some of the videos I have on YouTube you will find a lot of answers to basic questions on backpacking. This might be a good one to start with:
https://youtu.be/sjMhcS_Mokw
Hi Jessica/ Dixie,
I’ve been enjoying all your videos. They have been so helpful and encouraging. Thanks so much for posting and updating all your adventures.
I have one question at the moment –
On the Appalachian trail, how often did you have to replace the fuel canister on your stove?
The small one lasted me 3-5 days cooking three meals a day. It just depends on how often you use it 🙂
So if you’re planning A through hike on the AT. And you have a 75 L osprey that weighs 5.3 pounds and you’re recommending the 50 L or spray that weighs a pound under that is that going to make that big of a difference in the long run. And is that packing to be way overkill
So I’m planning a through hike for 2019 and I’m looking on starting on February 17. What day did you start on your AT Journey.
Congrats! My date was 3/29 on the approach trail.
I’m 67 and new to day hiking and backpacking. Love your channel; you’re so informative, authoritative and inspirational. Question: What do you use for your bear bag. Since I’m going to be hanging the bag, I’m actually more concerned with a critter resistant bag. Any suggestions? What did you see on the AT and PCT? Thank you.
Thank you for watching, Mike! I use the Zpacks bear bag now. If you go to the gear tab on the website you can see my gear lists for each trail 🙂
Wonderful videos! My daughter and I enjoyed watching them. You have excellent camera presence as we say in the biz. One question, did you get your rain suit at REI?
Thank you! I’m glad y’all are watching 🙂 I got the Frogg Toggs at Walmart, actually. Any outdoors store might carry them, too!
Looks like the Osprey Aura AG 50 has 3 sizes, an XS, S, and M, with 44, 47, and 50 [L] respectively. Which size did you have? what is an ideal pack capacity for a non- UL hiker?
I’m honestly not sure but either the medium or large. You need to get sized to know which to get. I’d say 50-65L will be good depending on your gear. Do you have a synthetic or down sleeping bag? Synthetic bags take up much more room than a down bag.
I just finished watching episode 12 (Creed, CO). Someone I knew committed suicide when I was in my late teens, then at 44 years of age I lost my husband to a right verbal stoke. There was a time after, the thought of suicide was an option for me. The only thing stopping me was my family, and how much that would hurt them. So, I decided to keep myself too busy to contemplate I’m that direction. Everything it was still in my thoughts, each day got a tiny bit better. I should have gotten professional help, but didn’t. I talking kept about it to whom ever would listen. I give big thanks to all that did listen.
Awesome videos jess! I been watching for a while i’m hoping to do the AT IN 2020 your an inspiration.. Keep up the battle girl.
Hey Jessica love the videos been watching for a while now cant get enough. I hope to take on the AT next year I live in Mass wondering if it would be better to start north and go south? i know it will be cold and probably the only one starting north and going south. dont want to miss out of all the good people you ran into walking south to north
Great videos. I bike pack around the world. Very familiar with hiking though.
I discovered the Inreach 6 years ago. As you said it is a huge peace of mind. It also does a great job at finding things, and recording history.
You mentioned in one of your videos you wished you had a watch with an altimeter. The unteach gives very accurate information related to altitude. In fact much more accurate than the Garmin 1000 or other devices
It also very accurately tracks sunrise/ set and location. I won’t leave home without it.
A story I tell is the time I left it on while flying. My son said it was hilarious watching me travel at 500 miles an hour at 35,000 feet
I’m unclear about multiple pairs of trail runners. You needed 3 pairs for the AT because each would wear out after 1/3 of the journey, or you like to have a variety so you choose the one pair that’s best for a particular trip?
Very helpful! Thank you for sharing your knowledge and experiences here and on YouTube.
Hi Dixie, I recently sold my 2 person (1 man) tent. I am going to replace it and have pretty much decided on either the Durston XMid Pro 2 or the BA Copper Spur UL 2. I have a Copper Spur UL 3 and like it for when I share a tent. I prefer to backpack solo. I am not a thru hiker. I do some extended backpacks and plan on doing Section J in Washington of the PCT this summer. I would really value your opinion.
Love your videos and it has been fun to watch them since the beginning. You have always had the eye and the videos just keep getting better.
WOW! Thank you for the shout out. That was so nice of you! 🙂